Integration with Databases
To work with data from any database, you first need to perform a few preparatory steps.
Step 1: Create a connection
First, you must create a connection matching the type of your target database. For the details, go to the Connections page.
Step 2: Create a connection node
Next, bring the created connection into your workflow by adding a connection node. This node's output will provide the data source connection parameters needed by other data access nodes.
To create the node:
- Open your workflow and expand the Connections pane to see the list of all connections created in the package.
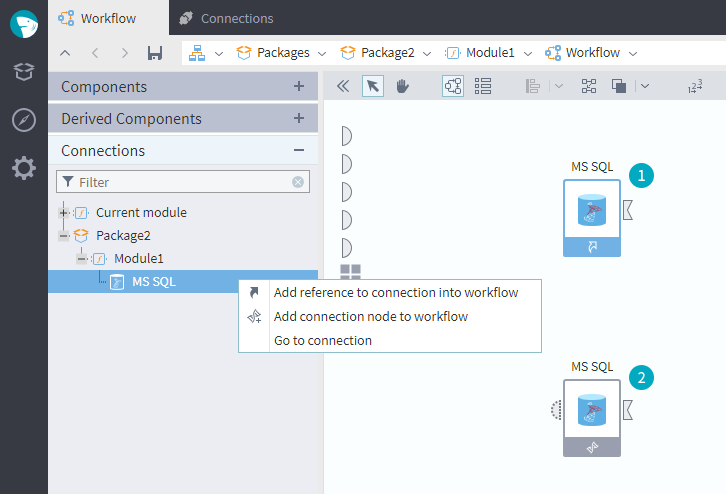
- Right-click the required connection in the list and use one of the methods specified in the context menu:

Add reference to connection into workflow: Creates a (1) Reference node for the connection that will be added to the workflow. It is also possible to create a Reference node by dragging the required connection to the workflow area. The Reference node directly uses the settings from the original shared Connection node. Any changes made later to the original connection node will affect the Reference node.
Add connection node to workflow: Creates a (2) derived node that inherits the settings of the selected connection. However, it is possible to change the settings of the derived node in its configuration wizard. (In this case, the settings of the node's "parent" connection will not change.)
- Go to connection: Brings you to the list of available connections.
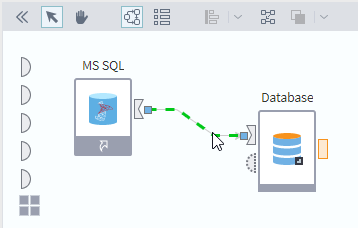
The data source connection parameters will be used by import/export nodes. To send them, link the output port of the connection node to the corresponding input port
of a data import or export node, as shown in the figure:

Step 3. Configure the import node
To retrieve data from the database, use the Database import node. This node allows you to import specific database tables or the results of custom SQL queries (along with the view).
Read on: Using Variables
